Monday, August 6, 2012

Fab Five 2012 Olympic Gymnastics Gold Medal Winning Team

I, like the majority of American women & girls, have fallen in love with the Fab Five - Gabby Douglas, Aly Raisman, Jordyn Wieber, Kyla Ross, & McKayla Maroney.  I was feeling especially inspired a few nights ago, and I thought I could make a doll leotard inspired by their red team leos with the crystals.  At first, it was just for me - just for fun.  Then, I realized that with my job - a gymnastics coach - the little girls would LOVE leotards like these for their dolls, and heck, why not dolls make in the likeness of each of the 5 team members? 

I made a prototype leotard that turned out pretty well, then after a few tweaks, I made 5 little matching leos - about the size for an American Girl Doll or similar 18" doll.  I made a crystal template with my Silouhette digital cutter.  I also made matching scrunchies.  I was having WAY to much fun!  I found dolls that looked like each of the girls, and got them all dressed up :)


Today, I got boxes for all of them, but it is taking a little longer than I expected to get them all put together.  I made each of them a mini gold medal, mini Sports Illustrated magazine, and mini bouquet of flowers.  I got Gabby done - maybe I'll finish the others tomorrow :)

 Front View


 Close Up


USAG Bio on the Back of the Box


So, I challenge a toy company to produce dolls like these - I guarantee they will sell!

Sunday, June 3, 2012

Transformers Little Boys' Bedroom

We moved into a new house in January, and my 5-year-old son kept telling me that the old house was so much nicer (it wasn't) and I couldn't figure out what he was talking about.  He then told me that he missed the murals I had painted on his bedroom walls in the old house (I did it to make the 17-year-old manufactured home that we had completely gutted and started remodeling seem more bearable for my little boys).  

The Old Bedroom

I asked him what would make the new house seem better (because it is, in fact, a LOT better!), and he informed me that he wanted a Transformers themed bedroom.  He wanted me to paint Bumblebee on his wall:


The Transformers edition of the Chevy Camaro

 I had to think about it for a long time, and I looked up some stuff on Google.  I didn't find any transformers themed room that I particularly liked, and I thought Bumblebee would be too hard to paint realistically, so I had to go conceptual.  I had an idea to do racing stripes - first I thought horizontal with one color on top and another on the bottom, but as I looked at pictures of Camaros online, I wanted it to look more like the hood of the car - here was my mock-up on the computer:


I had to match the Camaro yellow - not a paint color that covers very well - even the Glidden paint needed 3 or 4 coats to not look streaky.

I got to work sketching the Autobot emblem on the wall:


Then I taped off the racing stripes:


It was starting to look really cool, but I thought it was missing one thing . . .


 . . . the pin-striping on the sides of the racing stripes!

I finally finished it all up today - yay!


And most importantly, my boys love it :)


Las Vegas Boneyard


We went to Vegas for my In-Law's 40th Anniversary, and the one thing I really wanted to see was the Neon Museum's Boneyard. They have a lot of the old light-up signs from Fremont Street & The Strip, and I had a lot of fun taking pictures of them. I made these images with the photos I took :)

Wednesday, March 21, 2012

Nails


I wish I had taken a picture of these before they started to chip a little. So, I LOVE OPI topcoat - it is great, and I will never do my nails again without it! I had my nails painted neon green for St. Paddy's Day, and I got a little sick of the solid bright green by the end of the day, so the next morning I got creative with scotch tape, glitter & purple. I masked off parts of my nails using regular clear scotch tape and painted the glitter on. I took the tape off while my nails were still wet. I did my right hand first (harder for me to paint because I am right-handed), then after I took the tape off I did my left hand. A few hours later, after it was thoroughly dry, I masked my nails off again to paint the purple & removed the tape while my nails were still wet again. The design is so early 90s it kinds freaks me out. HA! I just think the masking idea is cool - sue whatever colors and pattern you want :) And don't forget to put on an OPI Topcoat!

Wednesday, March 14, 2012

Rivals Jamba Juice


So I just "accidentally" made the best smoothie ever! I have tried to make Jamba-inspired smoothies before, and they were horrible, but his time I ended up with a happy accident. I was eating lime sherbet with the boys, and I decided I wanted berries on mine, so I went to the freezer and pulled out the frozen mixed berries. As I was eating, I realized I had scooped up way too much sherbet for myself, and I thought, "this would be better in a smoothie." I dumped my leftover lime sherbet & blackberries in the blender, then added orange juice, strawberry yogurt, a bit more lime sherbet, more frozen mixed berries, and some frozen tropical fruit blend that my grandma got from the Schwann's man. As it all blended up it turned a wonderful magenta, and I got excited that it might have actually turned out good, and it was! I don't know exact amounts of what I put in, but just about equal parts of everything. It filled up my handy ASU insulated, reusable cold drink cup and I had a bit leftover. Maybe about 1/4 cup of each??? I used to always get a Strawberry Tsunami (now Strawberry Surfrider) with orange juice instead of lemonade, and I would say that this one I came up with almost tastes the same as that always did. Mr. C also approves! H doesn't want to give me my cup back.

Monday, March 12, 2012

ASU Cupcakes!


Here is my attempt at the layered cupcakes and the "rainbow" frosting techniques I saw on Pinterest. I went with maroon & gold for an ASU theme. Then printed out the mini pennants and used white glue to glue them to toothpicks to stick on top of each cupcake. The layering of the colored cake mix took FOREVER - I probably won't ever do it again, but it was fun. The frosting was easy and a really cool effect - I'll do that again.

Great way to display Photo Greetings


So my OBGYN's office has got the absolute best way to display the babys' birth announcements that they receive from patients. It's a metal Christmas tree with all of these scrolling branches. They just punch a hole in the top corner of each of the announcements and hook them on. This would be amazing for all of the photo greetings you get around the holidays! And look - Chase is still up there almost 2 years later!

I Love these Nails!


This is the third set of Sally Hansen Salon Effects I have done on my nails. I seriously LOVE them! I do a top coat of clear OPI to seal them, and every time they have lasted over 2 weeks. My nails grow out before they start to chip - it's truly amazing! They also help keep my nails strong - I have had no chips while these have been on my nails.

Friday, February 10, 2012

5 years later . . .

When Jackson (our 5 year old) was an infant, I saw somewhere the cutest idea of melting broken crayons into heart shapes for Valentines. I bought the molds way back then, but we had no classmates to make valentines for until last year. We tried to make them last year, but we used cheap Dollar store crayons so they did not color well. Also, I guess my mold was not 100% silicone - be sure to use a mold made for baking in - I had to throw mine away after we were done.


This year we made them with our broken Crayola's, and they turned out much better (except the colors since we only used broken crayons). Jackson also wanted to give his classmates the Star Wars valentines that he picked out, so I suggested we make little envelopes to put them in and stick the heart crayon on the outside of the envelope.


I read a couple of blogs that suggested using double sided sticky foam squares to stick the crayons on the paper, but the crayons were too waxy - it was a waste of $4. I ended up using a hot glue gun - it melted the back of the crayon heart just enough that it bonded to the hot glue & the paper.


We used Star Wars stickers on the back to seal the little envelopes - I think they turned out pretty cute.

Wednesday, February 8, 2012

Sally Hansen Salon Effects


Sally Hansen Salon Effects - I LOVE these! This is my second set - I just took the first ones off this morning after 19 days on my fingers. They held up really well, but my nails were growing so much that they started to look funny. They are a film of actual nail polish that you smooth onto your nails. They are not fake nails & they are not stickers. They are the best thing I have used so far. I do recommend a good clear topcoat over them, though. They come off with regular nail polish remover. When you take them off you can see that they are printed nail polish film. I would love to be able to personalize a set of these - your own printed designs - I wonder if that will ever be possible???

Fun with Instagram


Just thought this was a fun picture - taken at Chili's while waiting to be seated

I can copy anything


I have decided that I am not all that creative on my own, but show me something cool and I can figure out how to copy it - after all, they always say that imitation is the best form of flattery, right? Here is another amazing idea I got from Pinterest. The cables & clips are from Ikea & I cut out the vinyl lettering on my Silhouette digital cutting machine. This is the perfect way for us to display our kids' art since we have a stainless steel fridge but a big hallway ;)

Thursday, February 2, 2012

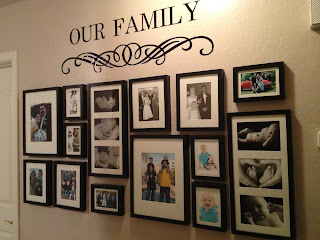
I've always wanted a photo wall like this

I have always wanted to have a wall in the hallway of my home to display family photos in a "collage" sort of way. At our first house I tried to just start hanging frames in a random order all over the wall, using only one nail in the center of each frame, and it always looked messy. At our second house, I resorted to a picture rail in the hall, but it collected too much dust.

At our new home, I wanted to do it the right way! So what did I do? I sat on Pinterest all night, ha ha! I was actually more than one night, and over the course of a couple of days, I planned out what I would do. We decided to get all of the frames from Ikea so they would all match, & it would be easier to hang them since the frames were all the same thickness.

I copied a couple of tutorials I saw where they used butcher paper to lay out off of the frames, trace them, and mark where the nails holes should go.


Then, we hung the butcher paper level on the wall with masking tape (a two-person job), and started pounding the nails in. I decided that I did not want these frames tilting all over the place like at our first home, so I put two nails at the top of each frame to keep the level. Also, be sure your nails are angled into the wall, so the frames do not slide off if a door is slammed a bit too hard (I'm speaking from experience). Once the nails are all in, you can carefully remove the butcher paper & start hanging your frames.


After I chose my photos for the frames, I felt like it was missing something. I have a Silhouette digital cutting machine, and I have seen a lot of cool inspirational wall art sayings cut out of adhesive-backed vinyl. I could not find one in particular that I liked, so I purchased the scroll design for $0.99 from the Silhouette online store, made it larger to fit the wall, and added the words.


I got a really good deal on my Silhouette from craigslist, and I am really glad that I got that particular digital cutter. It hooks to your computer when it cuts, and the designs are cheap. There ae no cartridges to buy, and you can just buy what you want when you want it from home. It also came with a $25 download card for designs. I have had the machine for over a year, and I still have not used up the $25. It also come with it's own software that is easy to use. If you want to create your own more intricate designs or company logos, there is a plug-in to cut straight from Adobe Illustrator, which I have used a lot! I have the old 8" wide machine, but their new "cameo" cuts up to 12" for scrapbooking.

Monday, January 30, 2012

Dinner Success


Now that I have been a wife for almost 6 years, and a mother for 5, I am finally learning how to cook dinner for my family. In part, I owe it to Pinterest - the rest of me is just sick of eating out all the time.

Saturday I made a broccoli pasta that was pretty good, but I guess my husband said it wasn't as good the second time around (he brought some leftovers to work for lunch today).

Tonight I got home at 6:50 from work, and Jon got home around 8:00pm - by the time he was home I had herb marinated chicken on the table & oreo brownie volcano cake in the oven. For the chicken, I used a website called www.recipekey.com where you tell it what you have in your pantry & it comes up with recipes that match several of the items. I had to modify the recipe a bit because I did not have time for a full-blown marinade, but it turned out great. I baked the chicken breasts in the marinade - it took a little longer to cook thoroughly, but it was very moist. Dessert was inspired by all of these desserts I see on Pinterest with oreos in them. It was supposed to be brownies (made from a box mix), but I didn't have any more eggs, so I substituted about 1/2 cup of applesauce and a dash of baking powder. It turned into an absolutely sinful dark chocolate oreo volcano cake!